Escape room games are quickly becoming my favorite time
waster, especially since I have a lot of time to waste getting stuck in
the traffic these days. If you haven’t played Factory96, I suggest
giving that a try too. Anyway, I’m knee deep into Escape Quest now, a
similar type of escape room game, so I thought I would take notes while I
play and help those who are stuck. Click on the Google Play or iTunes
icons below to download the game for free.

Escape Quest SPOILERS:
Similar to the other walkthroughs I have posted, I strongly recommend you try to guess the answers first. There is absolutely no fun if you just come here to copy all the answers. If you are stuck on a level, try asking around. Your friends, family or Facebook contacts might have a clue. The whole idea of this game is the joy of finding out the answers. Don’t spoil it for yourself by taking the easy way out!Escape Quest Level 1 Answer
This first level handily points you to the first clue as a tutorial. Do as the character says, click on the out-of-date Calendar to reveal the key behind it.
Then, take note of the roman numerals on the binders in the shelf (2-5-3) and use those numbers to open the safe under the desk. This will give you a hammer.
What do you hammer when you need help? The piggy bank of course! Break the little piggy to reveal a silver coin.
Tap around some more and you will find a panel at the shelf that uses the coin to unscrew the nuts. Open the box inside to reveal the door key, and use that key to open door. Yay!
Escape Quest Level 2 Answer

Notice on the wall that there are 4 picture frames, and each of them are rotatable and have different colored frames. If you look around the room, you will find more photo frames of similar color that will tell you which way the frames should be facing.
The black frame is by the door. You can’t miss it. The blue and red ones are in the shelf under the frames, and the green one is in a drawer in the computer table. Once you have all the frames facing the right way, the middle panel will automatically open revealing a 4-digit number for you (1-2-5-5).
Unfortunately, this is not the code to the door. This is a code for the computer. Input this code at the computer to reveal a black and white grid a couple of strange tiles. Pick the potted plants from the shelf and place them on the black and white grid on the floor where the strange tiles are located.
This will reveal numbers on top of the door (3-2-5-1) that you can use to open the door. Wait, it’s not over! It’s a bloody wall! Pick up the key from the wall and open the cupboard on your left. Escape!
Escape Quest Level 3 Answer

To begin, tap on the mirror to reveal some arrow keys. What could this mean? Don’t worry, it will all make sense.
On your left, the locker at the bottom can be opened. Pick up the wrench inside.
In the toilet, hygiene is important! Get some towels from the dispenser and clean them walls. Roman numerics will be displayed around the words. Break the special tile using the wrench and get the key inside.
This is where I got stuck, because I couldn’t figure out where the key goes! So let me enlighten you. In the middle sink, open the panel and adjust the levers based on the arrows you saw just now. Once done, pick up the key from inside the sink and escape!
Escape Quest Level 4 Answer
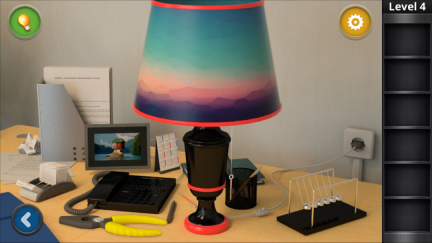
This one is a bit tricky.
First of all, there are a lot of things on the desk. Pick up whatever you can (wire cutter and needle).
I was wondering for hours about what to do next, but the answer was right there. I needed to use the wire cutter on the needle to bend it into a hook!
Use the hook to fish out the box in the aquarium. Inside is a blue key and a lightbulb.
Where does a lightbulb go? On a lamp of course! This will reveal a 4-digit number (2-1-7-3). Click on the painting on the wall and use the numbers to open the safe. Inside is a yellow key and a knife.
Sharks are nasty. Go ahead and use the knife on it to get the red key. Now you have all 3 keys. Unlocking the corresponding colored-locks will provide you with the door key to escape!
Escape Quest Level 5 Answer
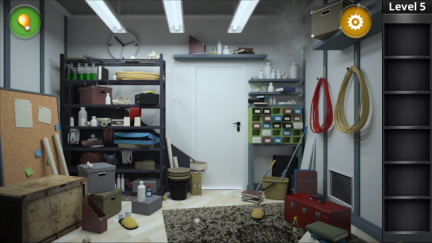
The difficulty is really starting to ramp up here.
Pick up the bottles in the room and combine them. Then use them on the glasses to reveal an intelligent clue. Notice how each bottle is separated into 4 sections? This means each color is denoted by a number:
yellow (4), red (2), green (1), blue (3)
Pick up the mop and use it at the top right corner of the room to reveal a 3-digit number (4-9-6).
Open the yellow bucket to get a key. Use the key to open the red toolbox. Inside is a screwdriver. Open the vent using the screwdriver and open the safe inside with the 3-digit number. Inside is a crowbar. Use the crowbar to open the crate on the left and use the numbers above (4-2-1-3) to get the door key. Escape!
Phew!
There you go. As usual, try to do the next five levels first. If you are really stuck, check this site again next week for the answers to levels 6-10. After completing the walkthroughs, I’ll probably post a review as well. Until then, take your time to look around the room and slowly investigate every inch. If all else fails, just start tapping everywhere and hope that something happens.. Hey, it works, sometimes..


